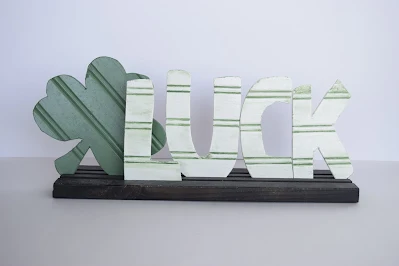
For the shamrock I used my silhouette. I just searched the online store and found a set of 3 shamrocks I liked. I cut it out on paper and then traced it to the bead board. Then I used a jig saw to cut them out. For the letters I used the font Elephants in Cherry Trees. I don't really recommend cutting such small letters with bead board.
Check out my K - the top painted coating came off while cutting it out. Also my C doesn't like to stay up. I sanded it down to be a little flatter, but it still sometimes falls.
For the colors I used Folk Art Wicker White for the letters, and Folk Art Thicket, mixed with a little white to lighten it, for the shamrock. I used Americana Staining Antiquing Medium and Thicket green for the glazing. For more tips on glazing and how to make my little stand see my Bead Board Pumpkins post.
I originally wanted to do two shades of green - but since I didn't want to go to the store with 4 kids in tow, I used what I had. I think I like the white and green. What do you think? Do you like it?


Rachel, this is awesome!! I just cannot get enough of beadboard- it rocks!!
ReplyDeleteHugs, Jen
I love checking out your new beadboard decorations for each holiday!! Am I reading right that you are using your Silhouette to cut wood?? I didn't know you could. To be honest, since you asked, I find the shamrock is missing a bit of definition; because it's dark green, you don't see the lines of the beadboard as much. If you like it like that then that's what counts!, this is just my thought :)
ReplyDeleteI guess I didn't explain that very well. I used the Silhouette to cut the shape on paper and then traced it to the bead board. Thanks so much for your comment. I've edited the post a bit to be more accurate.
DeleteCA-----ute! I love it! Never tire of beadboard :)
ReplyDeleteSherry's Bees Nest
This is so cute! you did a great job! I would love for you to stop by the Naturally-Nifty Linky Party and link this up!
ReplyDeletehttp://www.natural-nester.blogspot.com/2012/02/naturally-nifty-linky-party-4.html
I love beadboard! What a great idea!
ReplyDeleteFound you through Tatortots & Jello!
http://theterpblog.blogspot.com/
I like the bead board, so cute and i like the texture it gives the paint! Great job!
ReplyDeleteThis is great! I love the paint added in on the white letters. I hope you will link up to my St. Patty's Day Project Parade.
ReplyDeletehttp://www.itsybitsypaperblog.com/2012/03/st-pattys-day-project-parade-linky.html
Lovin the beadboard! Would you be willing to link up to my Springtime Holiday Link Party? I'd love to have you. Thanks, Michelle
ReplyDeletehttp://michellepaige.blogspot.com/2012/02/springtime-holiday-link-party.html
Very cute...Thanks for linking up @CountryMommaCooks…..have a wonderful week:)
ReplyDeleteRachel, Those are really cute! And what a great way to use up your bead board. Thanks for linking up over at SweetTalkin' Sunday!! OH BTW, I finished that book "Still Missing" as dark as it was, it was an amazing book. I figured it out, but it was still a really good read!!!
ReplyDeleteCute, cute! I really like the green stripes in the grooves.
ReplyDeleteI really like the white and green together! I do that all the time, have something in mind but don't want to run to the store with everyone. I think it totally works though. Thanks for sharing with us at Link It Up Thursday.
ReplyDeleteRachel- I featured your Bead Board St. Patrick's Day decor on my blog today! It was one of the top viewed links at Friday Frolic!! Feel free to stop by and grab a featured button:)
ReplyDeletehttp://www.karismaheartsavannah.blogspot.com/2012/03/friday-frolic-top-9-features.html
This is so great!!!! I love it and I'm featuring you on Sunday!
ReplyDeleteAw, cute! And festive too! Thanks for sharing at Shine on Fridays.
ReplyDeleteLove these! Perfect for the holiday :) Would LOVE to have you share this at my link party going on now....and if you like what you see become a new follower!
ReplyDeletehttp://www.pincushioncreations.com/2012/03/homemade-by-you-3.html
Super cute! Since the letters are placed in a stand that you make, I think adding some side braces (just extra wood in straight lines on either side of each letter) might help with the "standing" issue. Of course, you might have to make deeper grooves in your stand to hide them, but I think I might try it! I've Pin'd you. :)
ReplyDelete